The Blog
Search
Search
Exhibit
Fresh Photos
Editor's Choice Photos
Photoblogs
Upgrade
PRICING
Login
Start
Your 14-Day Free
Trial
Where you store your photos is as important as the photos you take.
Start Trial Now!
»
Wyoming Division HO Operation Layout
Wyoming Division HO Operation Layout
17 Photographing the WyoDivOps 12/14/19
By Verryl V Fosnight Jr
;
Jul 22, 2020
25 Photos
Share Album
Justified View
Flow View
Square View
Grid View
Journal View
Highlight View
Large Photo View
Slideshow
Proofing View
TV View
RSS
Verryl V Fosnight Jr
Featured
Gallery
About
Contact
Menu
Wyoming Division HO Operation Layout
Wyoming Division HO Operation Layout
17 Photographing the WyoDivOps 12/14/19
Jul 22, 2020
25 Photos
Share Album
Justified View
Flow View
Square View
Grid View
Journal View
Highlight View
Large Photo View
Slideshow
Proofing View
TV View
RSS
Featured
Gallery
About
Contact
Menu
×
Verryl V Fosnight Jr's Gallery
Wyoming Division HO Operation Layout
17 Photographing the WyoDivOps 12/14/19
https://verrylvfosnightjr.slickpic.com/albums/17-Photographing-The-WyoDivOps-121419/photo/#17054520
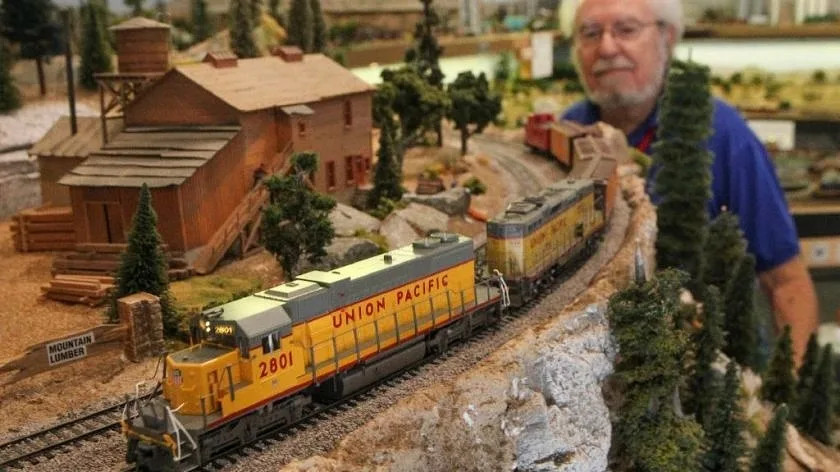
P1000788 of 071720 Foc Stk Look C&S
Possible Cover Photo for Sept 2020 MRH article on photography for model Railroads. This shows big boy 4015 passing local 2555 which has been pulled onto the Harriman Siding (center siding) at Wamsuttter. This is an in-camera focus stacked image in my Lumix G9 camera. This album presents all the images from the article, and the descriptions give brief explanations of the photography (Focus Stacking or Luminar 4's AI Sky Replacement tool) as well as post processing in Luminar.
https://verrylvfosnightjr.slickpic.com/albums/17-Photographing-The-WyoDivOps-121419/photo/#16990288
P1000617 PP exp DEs C&S smudge 011720
Welcome to my folder on model railroad photography. DISCLAIMER: some photos seem to be "over sharpened" by appearing "grainy" and/or show moire (Google "moire"--with an accent on the e), as this example image shows. This is because SlickPic, which I like very much, AUTOMATICALLY sharpens each photo uploaded to it. I guess they think most average photographers, a lot of whom use cell phones as cameras, need sharpening. Those of us who use fine cameras and sophisticated post processing computer programs, don't need extra sharpening, so I don't do any. I find modern cameras have amazing resolution anyway, so sharpening is hardly needed. So I ask you to ignore this flaw. The pictures I post do not show either excessive grain or moire. I have posted this photo from my files (i.e., not processed by SlickPic) on my WyoDivOps at Groups.io at https://groups.io/g/wyodivops
https://verrylvfosnightjr.slickpic.com/albums/17-Photographing-The-WyoDivOps-121419/photo/#16955606
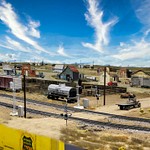
ca-times.brightspotcdn.com
This is a terrific photo I got off the net. But it is flawed; everything beyond the front of the second loco is out of focus. This is unavoidable with a single capture, because any camera lens, no matter how costly and well made only has a range of acceptable focus. Using a smaller aperture (larger F stop number) will extend the Dept of Field (DOF) but not enough to reach much, if any beyond the caboose. I never noticed this shallow DOF effect in taking photos of the Wyoming Division, until we started to have scenery on whole benches, and I wanted to see and show the details like grasses, ties between the rails, or corners of a fence or building. (See the Description for the next slide)
https://verrylvfosnightjr.slickpic.com/albums/17-Photographing-The-WyoDivOps-121419/photo/#17056119
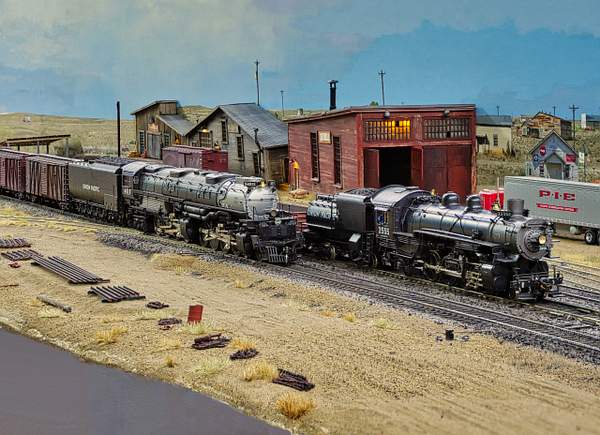
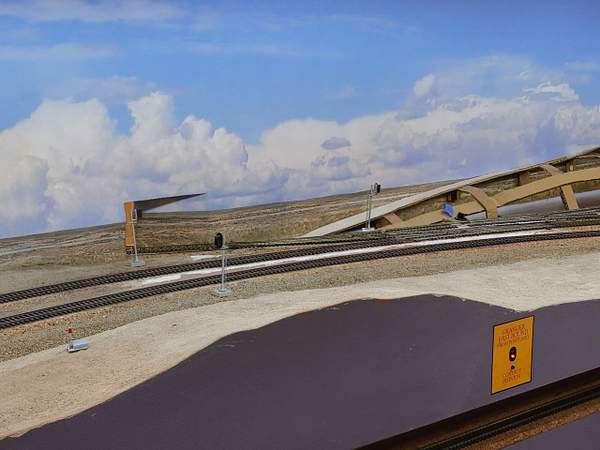
Signals Scenery 121118 (15) PP per sheet LDenoise 100 Boost 49
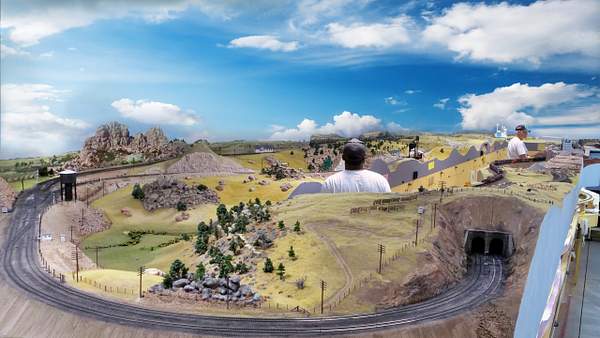
This cropped photo (top and left side) was suggested to Joe Fugate to be used as an example of the limits depth of field (DOF) imposes on picture taking, rather than the o. This photo is of Wamsutter, Wyoming, and it has good focus over a fairly wide depth of field--from about the start of the center siding out to nearly the single gondola, about the 6th car after the tender. Outside of those limits, both nearer to the camera or further the focus is poor. The distance from the camera to the eye-bolts of the main helix in the upper left corner is about 47 feet. Taken with a D7000 at f/8, 1/200 sec, and ISO 1000, focal length of 45mm/67 mm equivalent to a full frame 35mm camera).
https://verrylvfosnightjr.slickpic.com/albums/17-Photographing-The-WyoDivOps-121419/photo/#16955605
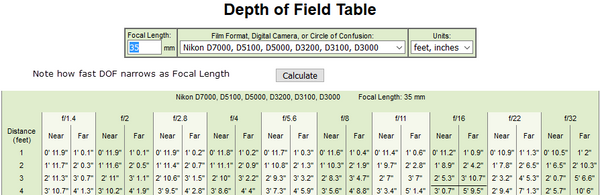
DOF Scan
This is a small part of a DOF Table from the internet for one of my cameras (Nikon D7000). With the camera set to f/16 (a pretty small aperture*) if the camera is pointed to the front edge of the bench about 3 feet away from that edge, the depth of field (DOF) would be only from about 3' 10.7" to 2' 5.3" or only 17.4 inches. The same DOF limit is for shooting along the bench. This is a pretty severe restriction (17.4") when you are trying to photograph benches that range from 42.8 feet (514 inches) to 59.9 feet (719.2 inches)!!! Photography is always a trade-off of light to expose the camera detector, and sensitivity of the detector, and DOF. To obtain a large DOF one has to set his lens/camera to a high f/stop number (very small aperture to let light through). And to get enough light for a proper exposure, one has to have either a fast (sensitive) detector and/or a long exposure time (time the shutter is open). (con't on next photo Description)
https://verrylvfosnightjr.slickpic.com/albums/17-Photographing-The-WyoDivOps-121419/photo/#16955607
Ops 121419 16_9 CE (3) SR D&B
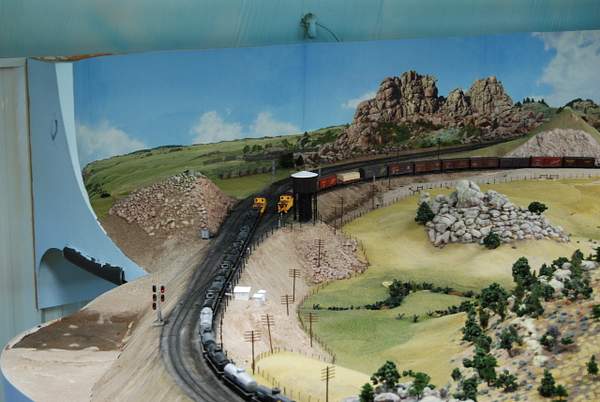
But camera detectors get noisy (bright spots on some pixels) when set to a high sensitivity (high ISO). Also a long shutter open time means the slightest--SLIGHTEST) movement will cause blur, if the camera is, jostled while the shutter is open. In other words, a very solid tripod may be required. The reality is, a DOF has its limitations due to physics, not quality or price...for any SINGLE exposure . This photo of the Sherman Hill west slope (foreground and bench to the right), and the east slope far left, tracks in front of the Sherman Station (center). This photo a blend, or overlay of about 30 exposures with the in-focus parts of each used to make a composite photo, called a "Focus Stack." Note that near and far parts of the image are in focus, and the scene is about 60 feet long!!! The Focus Stack feature is built into this new camera of mine. Notice that the backdrop sky has been replaced with a new sky and the new one extends all the way up as if the ceiling, lights and beams were not there.
https://verrylvfosnightjr.slickpic.com/albums/17-Photographing-The-WyoDivOps-121419/photo/#16955613
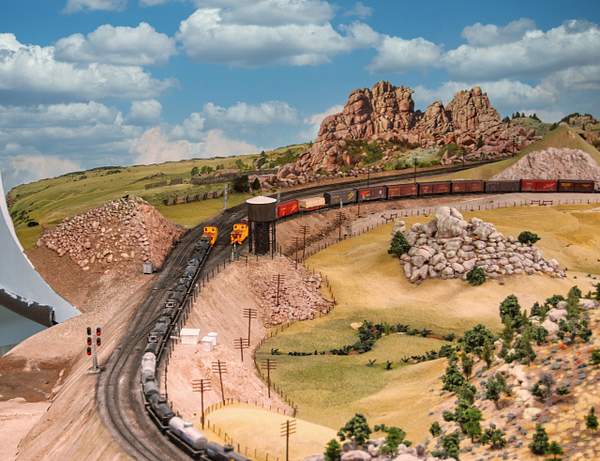
P1000436SR PPper sheet 01172020
This is a Focus Stacked image of the east slope of Sherman (to the right) and the west side (left) coming down towards Laramie. And I did a Sky Replacement as was done in the previous image. The Sky Replacement is probably a little overdone; the extreme left sky-ground looks unnatural. But it shows what can be done in Post Processing (PP). This Sky Replacement was done with Luminar 4, the latest PP software in that market.
https://verrylvfosnightjr.slickpic.com/albums/17-Photographing-The-WyoDivOps-121419/photo/#16955610
P1000608 AG SC AIE&S DE 01172020 Sh
https://verrylvfosnightjr.slickpic.com/albums/17-Photographing-The-WyoDivOps-121419/photo/#16955614
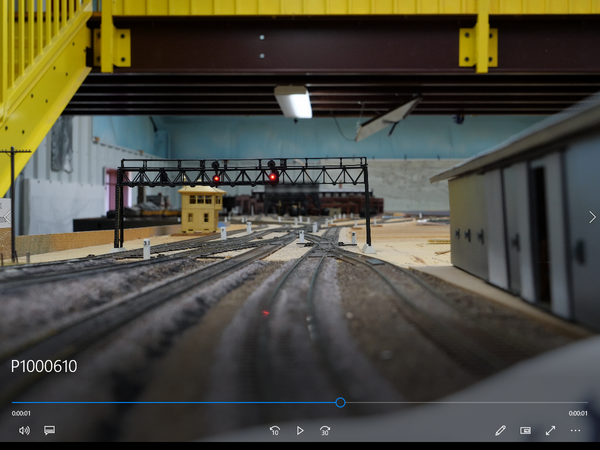
P1000610 MP4 Frame
This is a single image, not Focus Stacked image that I did not bother to fix the shadows and exposure problems in PP/ Note the very limited Depth of Field center on about the signal bridge. Even Tower A is out of focus.
https://verrylvfosnightjr.slickpic.com/albums/17-Photographing-The-WyoDivOps-121419/photo/#16955616
P1000613 Exp+31 SC AIE AIS SC 01172020
a second Focus Stack of about 30 photos assembled into a single image. It is over 40 feet to the Ogden yard map on the far wall.
https://verrylvfosnightjr.slickpic.com/albums/17-Photographing-The-WyoDivOps-121419/photo/#16955618
P1000615 CEB AC SC AIE&SDE S 01172020
A view from the corner of the layout capturing most of the upper level. Focus stacked of course. I have 2 methods of making focus stacks: 1) laboriously taking 6 or 8 photos with the camera on a tripod, and a focus made manually on a different part of the view, each different part progressively further (or nearer) to the camera. Then I assemble the multiple photos using special software called Helicon (there are others). The tripod holds the camera stead throughout the sequence; I use an electronic, hand- off-the-camera, shutter release to not jiggle the camera, and to further avoid camera motion, I have a camera whose mirror can be locked in up into the imaging position with the first push of the remote shutter release. The second press of the release opens the shutter--I wait a few seconds for all vibrations to damp out. (To find out about the "mirror" Google "Single Lens Reflex Cameras."
https://verrylvfosnightjr.slickpic.com/albums/17-Photographing-The-WyoDivOps-121419/photo/#16955621
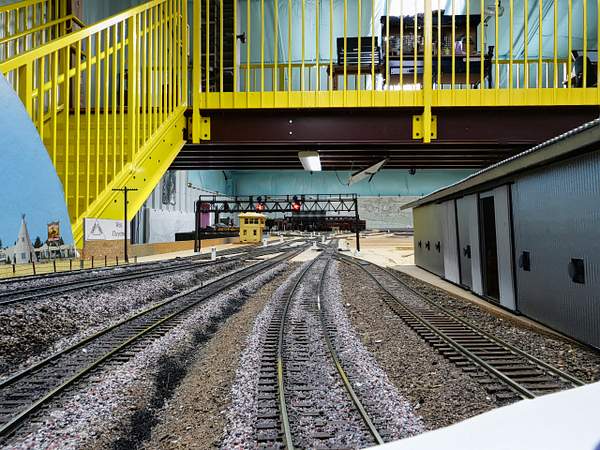
P1000617 PP exp DEs C&S smudge 011720
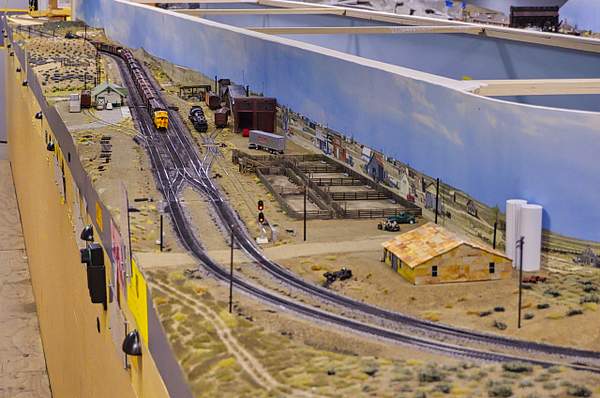
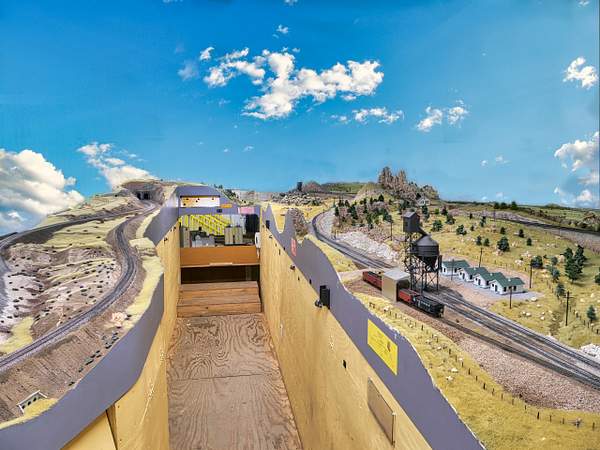
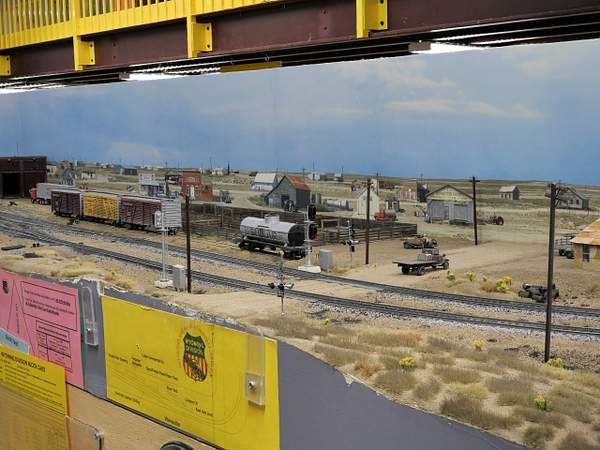
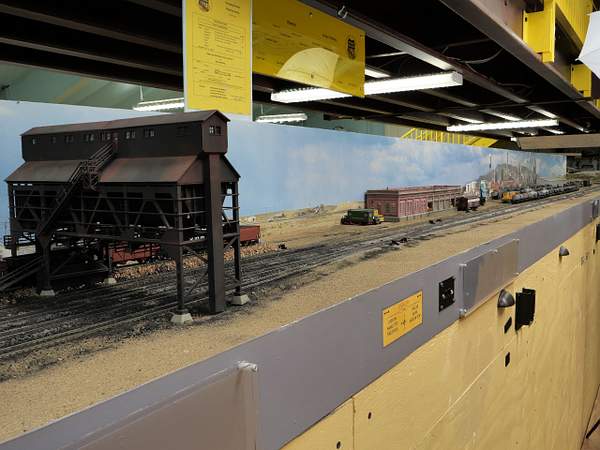
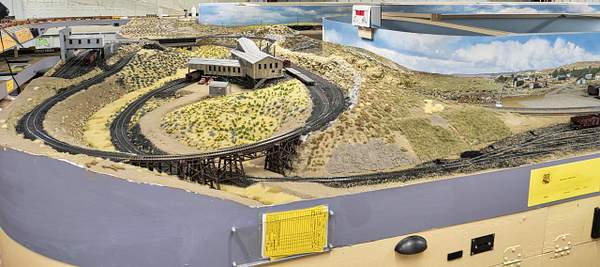
This is the beginning of the Oregon Short Line (OSL) to Portland (a staging yard) at its junction in Granger. The 3 signals on masts protect trains going onto the OSL through the "mouse hole" onto hidden track. The hidden single track loops around the end cap of the bench to the left and dives down rapidly to the shelf seen at the bottom right corner of the picture. There is a two aspect fascia mounted signal on the fascia between the lower level and the 3rd hidden level. The small button under this signal should be pushed by an engineer coming back from Portland to set the fascia aspect and the other far main to warn trains east bound on that far main track. The sky on the backdrop is "real," that it is Photoshoped onto the vinyl backdrop. Allen has yet to "plant" the buffalo grass here, and the ridge at the right is incomplete.
https://verrylvfosnightjr.slickpic.com/albums/17-Photographing-The-WyoDivOps-121419/photo/#16955624
P1000622 PP 01172020
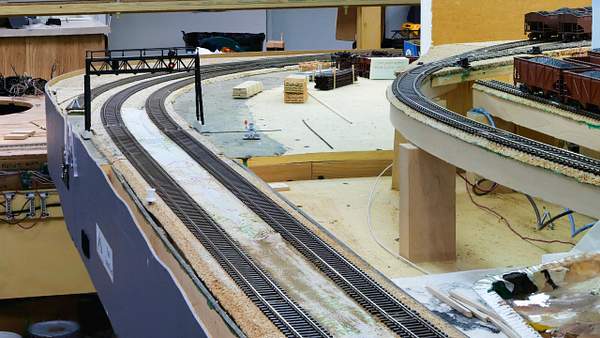
The main helix is across the aisle from this shot taken to show the Green River east signal bridge.
https://verrylvfosnightjr.slickpic.com/albums/17-Photographing-The-WyoDivOps-121419/photo/#16955627
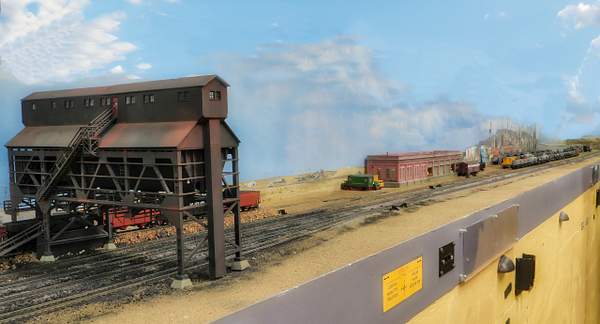
P1000622 PP Lum 4 Crop 16_9 01172020
Same photo cropped to 16:9 Two of the the coal marshaling yards are seen here also. The near one parallel to the mains is UP Coal Mine #9. The Reliance Mine is accessed via the track that curves around the #9 yard.
https://verrylvfosnightjr.slickpic.com/albums/17-Photographing-The-WyoDivOps-121419/photo/#16955629
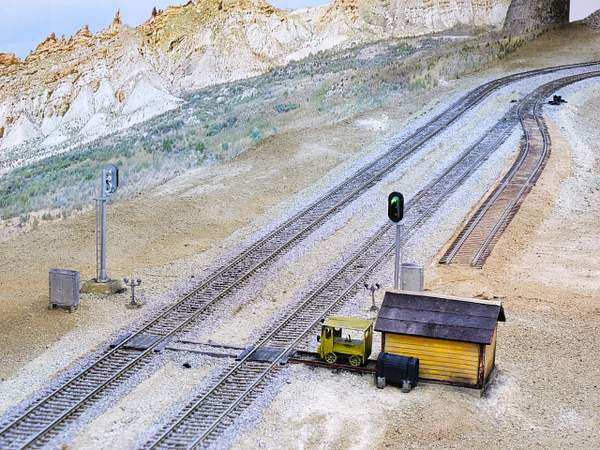
P1000628 PP 01172020
Lenny made this speeder shack with his 3D printer.The siding is Bitter Creek for sheep loading. This is a Post Focus/Focus Stack Lumix G9 image. There was no need to use Luminar 4's AI Sky Replacement here, because it is easy in photographing a close up to exclude parts of the building that show over the backdrop. But on the next shot...
https://verrylvfosnightjr.slickpic.com/albums/17-Photographing-The-WyoDivOps-121419/photo/#16956482
P1000409
Here is a sky replacement candidate, and it is a closeup. The steel beam lower portion of the overhead mezzanine shows here. Note the backdrop bottom edge can be discerned by looking at the shadow of the second telephone pole from the right (in front of the flatbed truck on the dirt road. I point this out to make a point about how well Allen matches the colors and textures of the bench scenery to the flat backdrop. The next post processed photo was done by Paul Saumure, m IT guy in California. He introduced me to both the Lumix G9 camera and the Luminar software. If this photo looks over-sharpened to you, it is. SlickPic sharpens all of the pictures uploaded to it. I don't like it, so I try not to do that in my PP.
https://verrylvfosnightjr.slickpic.com/albums/17-Photographing-The-WyoDivOps-121419/photo/#16956479
P1000409 PP Sky Replace
This is Paul's PP version with a Luminar4 AI (Auto Intelligence) Sky Replacement. On a normal photo the sky goes all the way to the top of the image. But on a model RR, the sky is usually painted or photo produced, like the last photo was. Luminar's AI Sky Replacement will not work in this case; Luminar does not recognize the sky if there is an overhanging mezzanine at the top. So you have to "fool" it. Using another layer of a sky, Paul moves it on the original image to where the upper non-sky part is covered with sky, Then he used the AI Sky Replacement tool to replace the original + layer sky with a new sky.
https://verrylvfosnightjr.slickpic.com/albums/17-Photographing-The-WyoDivOps-121419/photo/#16956481
P1000415
This is the original of a shot I took with the overhead steel kind of dominating the photo.
https://verrylvfosnightjr.slickpic.com/albums/17-Photographing-The-WyoDivOps-121419/photo/#16956480
P1000415 CONT EN LOOK_SKY REP_CROP
Here I just painted in sky over the steel upper structure to make it all sky. This was one of my first attempts. If you look at the large white "cloud" in the upperright hand corner, you can see that the "cloud" is composed of multiple copies of itself. Not too good.
https://verrylvfosnightjr.slickpic.com/albums/17-Photographing-The-WyoDivOps-121419/photo/#16956560
Ops 121419 16_9 CE (3)
Here is a nice photo to start, but I'd like to get rid of the building upper structure and far wall, and replace them with sky. As I said earlier, Luminar's AI Sky Replacement tool will not function if the very top of the image is not sky. So I set out to fool it.
https://verrylvfosnightjr.slickpic.com/albums/17-Photographing-The-WyoDivOps-121419/photo/#16956511
Ops 121419 16_9 CE (3) TEMP
To start to make the upper part all sky, I first crudely painted in a fake sky with the Clone & Stamp tool. The painted in part only needs to be sky blue or clouds, and it can be ugly and messy, because it is only temporary. You can see the beginnings of blue smears under the fan, over part of one light, and at the upper left. These messy blue and white clouds were eventually cloned and stamped all the way to the top of the image. They did not have to be pretty or neat, just blue and clouds copied (cloned) from the original sky image and pasted (stamped) to fool Luminar 4's AI Sky Replacement tool.
https://verrylvfosnightjr.slickpic.com/albums/17-Photographing-The-WyoDivOps-121419/photo/#16956505
Ops 121419 16_9 CE (3) SR
Making the C & S tool brush very large, I painted the rest of the non-sky image with blue and white clouds just to approximate sky. This step is not shown. Then with the entire upper portion of the image "sky" and "clouds," I did a Luminar 4 AI Sky Replacement. Luminar 4 comes with about 20 sky images to use for this process. You can also use your own photos. Living in the high desert-plains Arizona (elevation 5,000 feet+) the opportunities to take such photos are abundant. This photo is flawed. The sun appears to be in the north-north-west as determined by the lighter sky that direction with respect to UP tracks on Sherman Hill. Now I try to match my sky photos to the model scene. Don't tell anyone I should have done that here.
https://verrylvfosnightjr.slickpic.com/albums/17-Photographing-The-WyoDivOps-121419/photo/#16956504
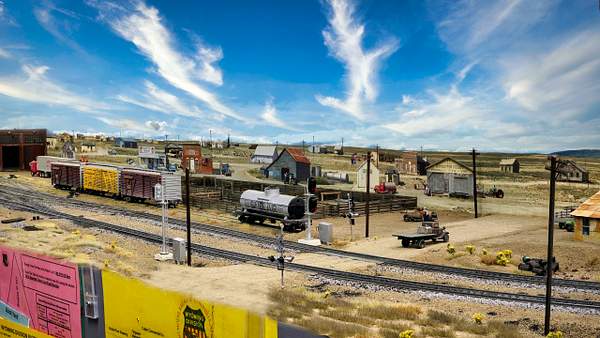
04 Ops 121419 16_9 PP (22)
I just threw this focus stacked photo in. this is the "4x8' layout" added on to the end cap of a bench. The mains can be seen at the right-center edge curving around to the next bench. This is the 2 mines plus supply stub track (at the center) at Hanna, WY. The mine tracks lead down to a coal marshaling yard along side the mains. The Hanna coal drag job is varied. First the operator is the coal agent who walks around the layout from here to Cheyenne and counts the empty hoppers. Car cards are not needed; any empty hopper belongs to the mine. Second he makes up his train of loads using the Hanna 4 axile diesel switcher. Third he attaches his caboose (it's 1957), and his 2 unit diesel consist to deliver his loads. He first has to get clearance from the Dispatcher, and if he has to stop on a main track, he must get clearance from DS again. After each stop to deliver coal, he picks up empties to return them to the mine.
https://verrylvfosnightjr.slickpic.com/albums/17-Photographing-The-WyoDivOps-121419/photo/#17054505
28 Scenery During Ops 101417 (50)
Two way meet at Dale Junction, Sherman Hill. This is the original photo right out of the camera (Nikon D80). See next image. Here the layout is in a slightly darker corner of the building, so the tracks in the center are under exposed, so this photo needed color and exposure adjustments. I also wanted to add an extension of the sky up to cover the blue painted building insulation on the inner building walls. The backdrop ends here so we can reach up to this upper level set of crossovers and turnouts that are copies of UP's tracks. At Dale tracks #1 and #2 are joined by Track #3, the Harriman Cutoff. They all come from Cheyenne to the far right. Then #1 and #2 continue through the Hermosa tunnels just out of the picture and on down into Laramie. From Dale down Sherman Hill to Laramie is left hand running, so the near train has crossed over from the far right-top track, #1 to #2. to continue down the on the left track. The other train has crossed over from #2 to #3 to go down to Cheyenne.
https://verrylvfosnightjr.slickpic.com/albums/17-Photographing-The-WyoDivOps-121419/photo/#17054500
28 Scenery During Ops 101417 (50)PPsheet Crop
Two way meet at Dale Junction, Sherman Hill. (Photo post processed from original in previous image.) While staying at home to avoid COVID I came across this photo and processed it and cropped it for this album. I added a sky with Luminar's AI Sky Replacement tool after Cloning and Stamping a messy sky above the backdrop over the original building wall and roof. This temporary "sky" fooled Liminar so that the AI Sky Replacement will work (sky must be at the top of an image for the AI Sky Replacement tool to work. The main exposure adjustment needed was to lighten the Dale tracks. This shows the multiple signal heads at the Junction very well. I also cropped off the left side of the original to avoid cloning an stamping more sky there because it would be too low in the scene. This shot was taken before I began to realize the inherent depth of field problem of any camera-lens. Note the fuzziness of the bottom 1/4 of the image.
16 Spring Invitational (5th) Ops Meet
18 Ops 121419
03 Phase III Construction
04 Phase IV All Track Done--Details
05 Structures
06 Wyoming Division Operation Sessions
07 Fall Invitational Nov 12-14, 2016
08 First Annual Winter Invitational
09 Backdrops Signals Scenery
10 Backdrops Signals Scenery
11 2017 Winter Invitational Meet BBQ
12 2017 Winter Invitational Meet Ops
13 Winter Invitational 2017 Lenander Photos
14 2018 Fourth Winter Invitational
16 Spring Invitational (5th) Ops Meet
17 Photographing the WyoDivOps 12/14/19
18 Ops 121419
19 Photos "Lightweight Ops Article"
20 Scenery and Structures June 2020
21 Wyoming Division Scenery
22 ABS Signals
23 Structures During Pandemic
24 Post Pandemic August 2022
25 How We Operate-Fall 2022
Scroll To Top
Slideshow
By Email
Link:
Copy Link
?
Close Sidebar
Verryl V Fosnight Jr
PRO
Follow
Following
Unfollow
Contact
Photo Details
Date
Dimensions
Size
File
Camera
ISO Speed
Exposure
Aperture
Focal Length
Flash
Display Image Quality
Tags
Comments
No comments yet...
All fields are required, fill in the form.
Comment successfully added.
Comment
New comments notifications
Audio Mute
Prev
Play
Next
Shuffle
Include
Privacy and cookie policy
This site uses cookies to enhance your browsing experience, serve personalized content, and analyze traffic. By continuing to use this site you agree to
use of cookies and stewardship of your data
.


No comments yet...
All fields are required, fill in the form.
Comment successfully added.
Comment